2013. 10. 21. 10:26

  [출처] Eclipse javascript 자동완성 플러그인 JSDT 설치|작성자 의댕군


 JSDT를 소개


JavaScript Development Tools (JSDT) 는 Eclipse 홈에서 제공하고 있습니다.


Step#1

- JSDT는 여타 다른 plug-in들과 같이 이크립스 마켓을 통하여 다운로드를 지원하고 있습니다.


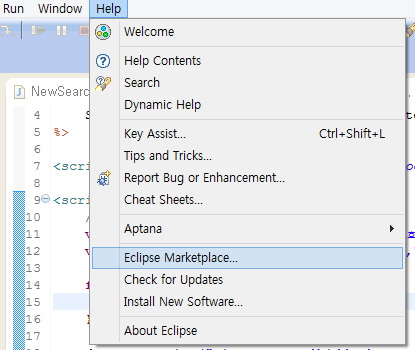
Help -> Eclipse Marketplace 클릭!
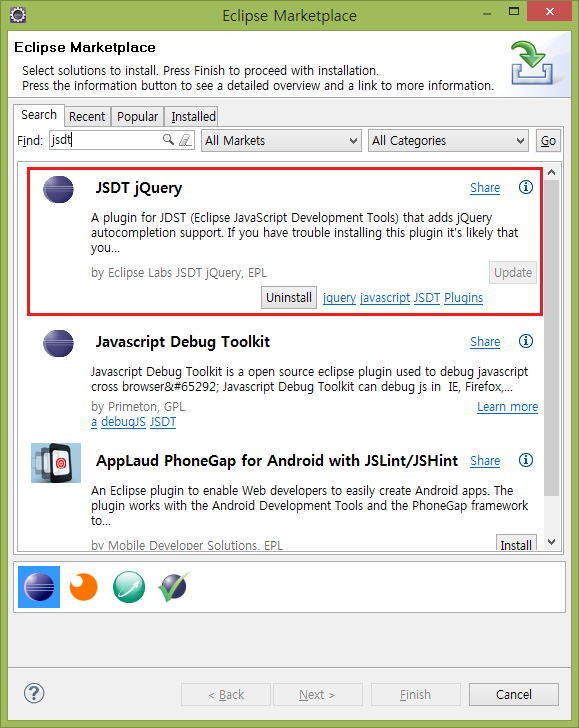


find에서 jsdt를 검색 하신뒤 

Install 버튼을 눌러주시면 됩니다. ( 저는 이미 설치한 뒤라 Uninstall과 Update 버튼이 있네요;;)


Step#2

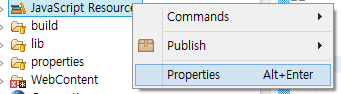
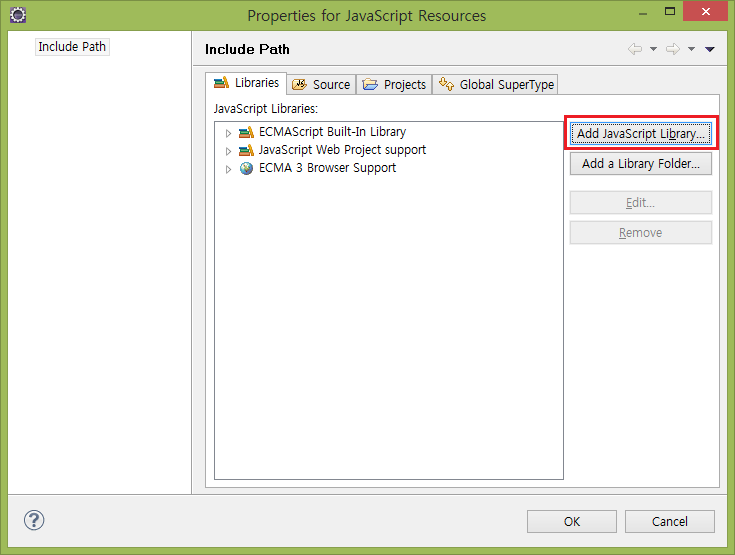
- 플러그인 설치가 끝나시면 크게 다른 부분들을 설정할 필요가 없이 적용하려고 하는 웹 프로젝트에서 javaScript Resource를 우클릭!
 그리고 Properties를 클릭!


그러면 아래와 같은 자바스크립트 라이브러리를 추가할 수 있는 메뉴가 뜹니다.

여기서 추가하려고 하는 라이브러리를 Add JavaScript Library 누른뒤 선택하시면 됩니다.
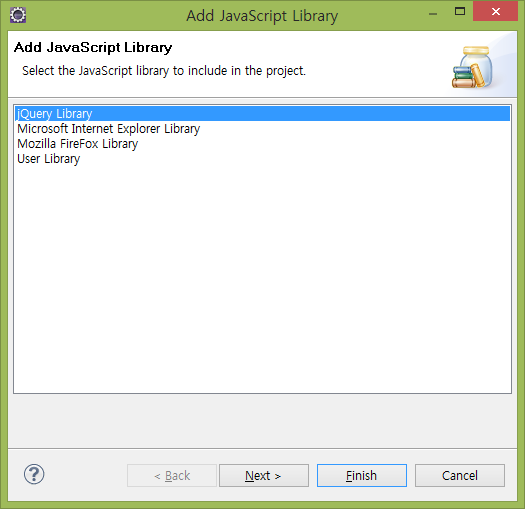


Step#3
-  jQuery Library를 선택


Step#4
- 프로젝트에서 사용하는 jQuery 버전 선택.
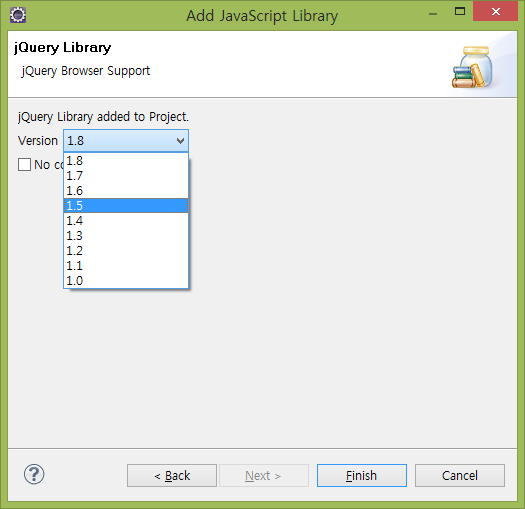
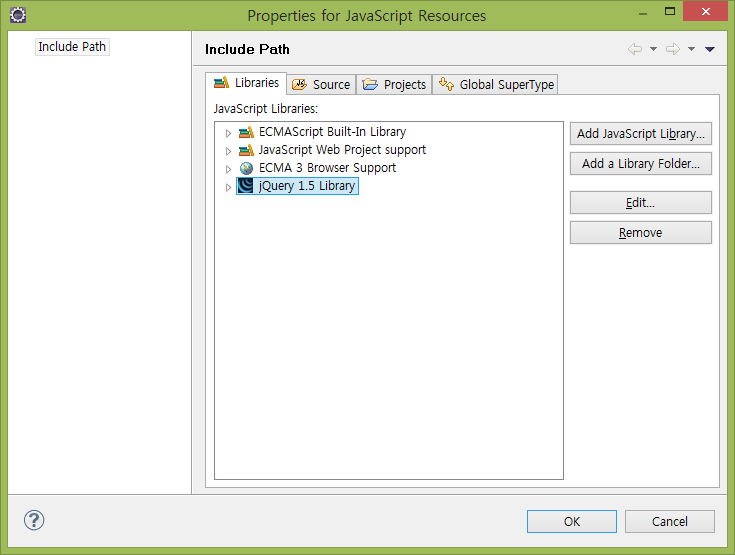


Step#5
- 그러면 아래와 같이 라이브러리가 추가 된 것을 볼 수 있습니다.


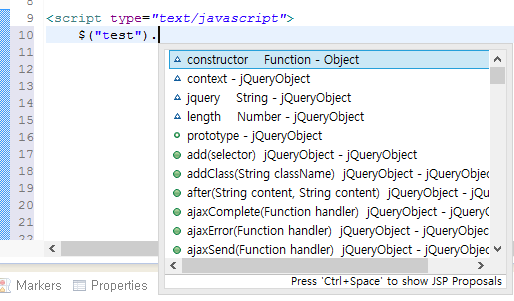
자 이제 사용학 위한 설정은 다 끝났구요 적용된 화면 입니다.


'2019년 이전 정리 > JavaScript & Jqeury & Ajax & JSP' 카테고리의 다른 글

페이징처리 4 [클래스코드]  (0) 2013.11.22
페이징처리 2  (0) 2013.11.20
게시판 페이징 처리  (0) 2013.11.19
Check if inputs are empty using jQuery  (0) 2013.10.24
Javascript 문법검사  (0) 2013.10.22
Posted by hoonihoon
2013. 10. 8. 17:35

This subject is discussed in the Android Training:

http://developer.android.com/training/multiscreen/screensizes.html#TaskUseSWQuali

If you read the entire topic, they explain how to set a boolean value in a specific value file (as res/values-sw600dp/):

<resources>
    <bool name="isTablet">true</bool>
</resources>

Because the sw600dp qualifier is only valid for platforms above android 3.2. If you want to make sure this technique works on all platforms (before 3.2), create the same file in res/values-xlarge folder:

<resources>
    <bool name="isTablet">true</bool>
</resources>

Then, in the "standard" value file (as res/values/), you set the boolean to false:

<resources>
    <bool name="isTablet">false</bool>
</resources>

Then in you activity, you can get this value and check if you are running in a tablet size device:

boolean tabletSize = getResources().getBoolean(R.bool.isTablet);
if (tabletSize) {
    // do something
} else {
    // do something else
}


Posted by hoonihoon
2013. 9. 12. 16:25
FAQ : 프로그래밍적으로 키보드 숨김/감춤/보기. 액티비티 시작시 키보드 숨김/감춤/보기, EditText선택시 키보드 안뜨게하기 등 소프트 키보드 동작 관련 질문에 대한 답변

1. 키보드 감추기

EditText editText = (EditText) findViewById(R.id.myEdit);
InputMethodManager imm = (InputMethodManager)getSystemService(Context.INPUT_METHOD_SERVICE);
imm.hideSoftInputFromWindow(editText.getWindowToken(), 0);

2. 키보드 보여주기
EditText editText = (EditText) findViewById(R.id.myEdit);
InputMethodManager imm = (InputMethodManager) getSystemService(Context.INPUT_METHOD_SERVICE);
imm.showSoftInput(editText, InputMethodManager.SHOW_FORCED);

위 코드로 안보이는 경우 아래코드도 시도해보세요
- imm.showSoftInputFromInputMethod (editText .getApplicationWindowToken(),InputMethodManager.SHOW_FORCED);

onCreate등에서 제대로 동작하지 않는다면 
Handler로 post를 해서 위 코드를 실행시켜보세요.

3. 키보드 토글 - 위 두가지 방법으로 안되는 경우 다음과 같은 코드로 동작하는 경우가 있습니다.
imm.toggleSoftInputFromWindow(editText.getApplicationWindowToken(),  InputMethodManager.SHOW_FORCED, 0); 

4. 액티비티 시작시 자동으로 키보드 보여주기
AndroidManifest.xml의 activity 태그의 속성에 android:windowSoftInputMode="stateVisible" 혹은 "stateAlwaysVisible"삽입

5. 액티비티 시작시 자동으로 키보드 보여주지 않기
AndroidManifest.xml의 activity 태그의 속성에 android:windowSoftInputMode="stateHidden" 혹은 "stateAlwaysHidden" 삽입

6. 에디트 텍스트 선택해도 키보드 안뜨게 하기
EditText xml 속성에서 inputType 을 0으로 주면 안뜹니다.

반복되는 질문을 정리하는 FAQ 작업 진행중입니다. 키보드 동작 관련해서 정리할 글입니다. 
잘못된 부분이나 추가할 부분있으면 알려주세요.


출저: 안드로이드펍 :http://www.androidpub.com/1104990

Posted by hoonihoon
2013. 8. 22. 17:40

출저: http://www.dibbus.com/2011/02/gradient-buttons-for-android/

Just some other stuff to share with you, no 3D, no Umbraco bust some new gradient buttons for Android.

Capture
Yes I’m into android now, and I just love it. Really fun programming for Android. Because I really like a nice layout here are, for a start some nice button layouts. Use them for a better layout and replace those gray android buttons.
I’ve used two color gradients. The sdk permits a third color, I’ll use a third color maybe in a next post. For the colors I just took 2 colors,not too much differ from each other. Take your own colors if you like.

Blue button

01
02
03
04
05
06
07
08
09
10
11
12
13
14
15
16
17
18
19
20
21
22
23
24
25
26
27
28
29
30
31
32
33
34
35
36
37
<?xml version="1.0" encoding="utf-8"?>
    <item android:state_pressed="true" >
        <shape>
            <solid
                android:color="#449def" />
            <stroke
                android:width="1dp"
                android:color="#2f6699" />
            <corners
                android:radius="3dp" />
            <padding
                android:left="10dp"
                android:top="10dp"
                android:right="10dp"
                android:bottom="10dp" />
        </shape>
    </item>
    <item>
        <shape>
            <gradient
                android:startColor="#449def"
                android:endColor="#2f6699"
                android:angle="270" />
            <stroke
                android:width="1dp"
                android:color="#2f6699" />
            <corners
                android:radius="4dp" />
            <padding
                android:left="10dp"
                android:top="10dp"
                android:right="10dp"
                android:bottom="10dp" />
        </shape>
    </item>
</selector>

Red button

01
02
03
04
05
06
07
08
09
10
11
12
13
14
15
16
17
18
19
20
21
22
23
24
25
26
27
28
29
30
31
32
33
34
35
36
37
<?xml version="1.0" encoding="utf-8"?>
    <item android:state_pressed="true" >
        <shape>
            <solid
                android:color="#ef4444" />
            <stroke
                android:width="1dp"
                android:color="#992f2f" />
            <corners
                android:radius="3dp" />
            <padding
                android:left="10dp"
                android:top="10dp"
                android:right="10dp"
                android:bottom="10dp" />
        </shape>
    </item>
    <item>
        <shape>
            <gradient
                android:startColor="#ef4444"
                android:endColor="#992f2f"
                android:angle="270" />
            <stroke
                android:width="1dp"
                android:color="#992f2f" />
            <corners
                android:radius="3dp" />
            <padding
                android:left="10dp"
                android:top="10dp"
                android:right="10dp"
                android:bottom="10dp" />
        </shape>
    </item>
</selector>

Purple button

01
02
03
04
05
06
07
08
09
10
11
12
13
14
15
16
17
18
19
20
21
22
23
24
25
26
27
28
29
30
31
32
33
34
35
36
37
<?xml version="1.0" encoding="utf-8"?>
    <item android:state_pressed="true" >
        <shape>
            <solid
                android:color="#a276eb" />
            <stroke
                android:width="1dp"
                android:color="#6a3ab2" />
            <corners
                android:radius="3dp" />
            <padding
                android:left="10dp"
                android:top="10dp"
                android:right="10dp"
                android:bottom="10dp" />
        </shape>
    </item>
    <item>
        <shape>
            <gradient
                android:startColor="#a276eb"
                android:endColor="#6a3ab2"
                android:angle="270" />
            <stroke
                android:width="1dp"
                android:color="#6a3ab2" />
            <corners
                android:radius="4dp" />
            <padding
                android:left="10dp"
                android:top="10dp"
                android:right="10dp"
                android:bottom="10dp" />
        </shape>
    </item>
</selector>

Green button

01
02
03
04
05
06
07
08
09
10
11
12
13
14
15
16
17
18
19
20
21
22
23
24
25
26
27
28
29
30
31
32
33
34
35
36
37
<?xml version="1.0" encoding="utf-8"?>
    <item android:state_pressed="true" >
        <shape>
            <solid
                android:color="#70c656" />
            <stroke
                android:width="1dp"
                android:color="#53933f" />
            <corners
                android:radius="3dp" />
            <padding
                android:left="10dp"
                android:top="10dp"
                android:right="10dp"
                android:bottom="10dp" />
        </shape>
    </item>
    <item>
        <shape>
            <gradient
                android:startColor="#70c656"
                android:endColor="#53933f"
                android:angle="270" />
            <stroke
                android:width="1dp"
                android:color="#53933f" />
            <corners
                android:radius="4dp" />
            <padding
                android:left="10dp"
                android:top="10dp"
                android:right="10dp"
                android:bottom="10dp" />
        </shape>
    </item>
</selector>

Yellowbutton

01
02
03
04
05
06
07
08
09
10
11
12
13
14
15
16
17
18
19
20
21
22
23
24
25
26
27
28
29
30
31
32
33
34
35
36
37
<?xml version="1.0" encoding="utf-8"?>
    <item android:state_pressed="true" >
        <shape>
            <solid
                android:color="#f3ae1b" />
            <stroke
                android:width="1dp"
                android:color="#bb6008" />
            <corners
                android:radius="3dp" />
            <padding
                android:left="10dp"
                android:top="10dp"
                android:right="10dp"
                android:bottom="10dp" />
        </shape>
    </item>
    <item>
        <shape>
            <gradient
                android:startColor="#f3ae1b"
                android:endColor="#bb6008"
                android:angle="270" />
            <stroke
                android:width="1dp"
                android:color="#bb6008" />
            <corners
                android:radius="4dp" />
            <padding
                android:left="10dp"
                android:top="10dp"
                android:right="10dp"
                android:bottom="10dp" />
        </shape>
    </item>
</selector>

Blackbutton

01
02
03
04
05
06
07
08
09
10
11
12
13
14
15
16
17
18
19
20
21
22
23
24
25
26
27
28
29
30
31
32
33
34
35
36
37
<?xml version="1.0" encoding="utf-8"?>
    <item android:state_pressed="true" >
        <shape>
            <solid
                android:color="#343434" />
            <stroke
                android:width="1dp"
                android:color="#171717" />
            <corners
                android:radius="3dp" />
            <padding
                android:left="10dp"
                android:top="10dp"
                android:right="10dp"
                android:bottom="10dp" />
        </shape>
    </item>
    <item>
        <shape>
            <gradient
                android:startColor="#343434"
                android:endColor="#171717"
                android:angle="270" />
            <stroke
                android:width="1dp"
                android:color="#171717" />
            <corners
                android:radius="4dp" />
            <padding
                android:left="10dp"
                android:top="10dp"
                android:right="10dp"
                android:bottom="10dp" />
        </shape>
    </item>
</selector>

All text on the buttons will have the same styleso we can define a style in strings.xml:

01
02
03
04
05
06
07
08
09
10
11
12
13
<style name="ButtonText">
    <item name="android:layout_width">fill_parent</item>
    <item name="android:layout_height">wrap_content</item>
    <item name="android:textColor">#ffffff</item>
    <item name="android:gravity">center</item>
    <item name="android:layout_margin">3dp</item>
    <item name="android:textSize">30dp</item>
    <item name="android:textStyle">bold</item>
    <item name="android:shadowColor">#000000</item>
    <item name="android:shadowDx">1</item>
    <item name="android:shadowDy">1</item>
    <item name="android:shadowRadius">2</item>
</style>

Together you’ll have a nice collection of nice buttons:
Source code of an activity layout:

01
02
03
04
05
06
07
08
09
10
<?xml version="1.0" encoding="utf-8"?>
<LinearLayout xmlns:android="http://schemas.android.com/apk/res/android" android:layout_width="fill_parent" android:layout_height="fill_parent"
    android:orientation="vertical">
   <Button android:text="Button" android:id="@+id/button1" android:background="@drawable/btn_red" style="@style/ButtonText"></Button>
   <Button android:text="Button" android:id="@+id/button2" android:background="@drawable/btn_blue" style="@style/ButtonText"></Button>
   <Button android:text="Button" android:id="@+id/button3" android:background="@drawable/btn_purple" style="@style/ButtonText"></Button>
   <Button android:text="Button" android:id="@+id/button4" android:background="@drawable/btn_green" style="@style/ButtonText"></Button>
   <Button android:text="Button" android:id="@+id/button5" android:background="@drawable/btn_orange" style="@style/ButtonText"></Button>
   <Button android:text="Button" android:id="@+id/button6" android:background="@drawable/btn_black" style="@style/ButtonText"></Button>
</LinearLayout>

Just for this post I’ve used normal colors. In a standard application you’ll define these colors in the string.xml as a color.

TIP: last but not least, read also this post from Kris, a great developer about this topic! If you have any questions from above, the post from Kris will surely answer it.

If you want to see all those buttons in action, I’ve created a demo app with all kinds of buttons and an option to create xml for a button of your choise.

Posted by hoonihoon
2013. 8. 19. 15:30

So I ended up solving this via the link in James Moore's comment here. I ended up using the Tony Blues's solution in that link. That solution is this:

1.) Set an onTouchListener to the TextView.

2.) Get the layout of the TextView.

3.) Get the x,y coordinates of the touch via the event.

4.) Find the line and offset (index) based on that event.

The following code example is how one would Log (in verbose) the index of a touch given a TextView named manip:

manip.setOnTouchListener(new View.OnTouchListener() {
    public boolean onTouch(View v, MotionEvent event) {
    Layout layout = ((TextView) v).getLayout();
    int x = (int)event.getX();
    int y = (int)event.getY();
    if (layout!=null){
        int line = layout.getLineForVertical(y);
        int offset = layout.getOffsetForHorizontal(line, x);
        Log.v("index", ""+offset);
        }
    return true;
}
});


출저 : http://stackoverflow.com/questions/6285682/onclick-position-in-string-in-textview

Posted by hoonihoon
2013. 8. 18. 10:13

public class ZipTest extends AndroidTestCase {

String testUrl = 

"http://files.parse.com/b18520bb-433b-4d@@@@@@@@@@@@@@@3-binibean.zip";


public void testZip() {

NOFileDownloadManager manager = new NOFileDownloadManager(mContext, testUrl);

manager.download(new NOFileDownloadThread(mContext, manager));


try {

manager.getCurrentThread().get();

} catch (Exception e) {

e.printStackTrace();

}


File file2 = new File(mContext.getFilesDir(), "/character/binibean");

File []pngs = file2.listFiles();

assertEquals(6, pngs.length);

assertEquals(file2.getAbsolutePath() + "/binibean_01.png", pngs[0].getAbsolutePath());

}

}


테스트 코드 가정

1. FileDownloadManager 는 Parse 에서 Image zip파일을 다운로드 받는다.

2. 그리고 app내 files 폴더에 압축을 해제하고, zip파일을 날린다.


결과 

1. 파일이 files 폴더에 image파일로 저장되어있는지 확인해야한다.

딱히 파일체크를 하는 코드를 만들필요없이. assertEquals 에서 파일 갯수가 맞는지 체크하고 그 파일의 AbsolutePath()에 저장되어있는지 확인.


이렇게해서 검증된 코드는 믿음이 간다. 실제로 여러명이 프로젝트를 진행하는 경우에, 몇번의 디버깅을 통해 소스를 merge 하는 것보다. TDD 방식을 통해 검증된 코드를 merge 하면 업무의 효율성이 높아 지지 않을까 생각해 본다. 


'2019년 이전 정리 > TDD' 카테고리의 다른 글

TDD 에 관해  (0) 2013.08.18
Posted by hoonihoon
2013. 8. 18. 10:05

TDD는 Test Driven Development 의 약자이다. 우리나라 말로 하면 테스트 주도 개발이라는 뜻이다. 지금까지의 개발 방식과 다르게, 테스트할 코드를 먼저 작성하고 코드를 개발하는 다소 특이한 개발 방법이다.


기존 개발 절차

디자인 -> 개발 -> 테스트

TDD의 개발 절차

테스트, 스크립트 개발 -> 개발 -> 리팩토링


TDD 를 실무 적용하지 못하는 이유는 시간적 여유입니다. 언제 테스트 스크립트를 만들고 개발하냐는 것이죠.


"단지 개발하면서 테스트 스크립트를 만들었고 게다가 리팩토링까지 수행했다면, TDD를 적용했다고 할 수 있는 것이다. 그리고 테스트 스크립트를 코드와 같이 작성하고 오류를 점검한다는 개념 자체가 중요한 것이다."


출저:http://sangjjang.tistory.com/175


Test the program before you wirte it.                 

-Kent Beck


TDD란 뭘까?


XP(eXtream Programming) 창시자 중 한명이며, TDD를 주도한 켄드 벡은 TDD를 소개한 자신의 책에서 "프로그램을 작성하기 전에 테스트를 먼저 작성하는 것" 이라고 테스트 주도 개발을 정의했다.


"업무 코드를 작성하기 전에 테스트 코드를 먼저 만드는 것!"


잘 동작하는 깔끔한 코드

 Clean code theat works  - Ron Jeffries


우리가 TDD라는 방식을 통해 얻고자 하는 최종 목적은 '잘 동작하는 깔끔한 코드' 이다.


이는 일반적인 소프트웨어 개발의 목표와 별반 다르지 않다. 다만 TDD에선 정상적으로 동작하는 코드만을 목표로 삼지 않고, 작성된 코드도 명확한 의미를 전달할 수 있게 작성되어야 한다고 말한다. 즉, '제대로 동작함(works)'뿐 아니라 '깔끔함(clean)'까지도 동등한 수준의 개발 목표로 삼는다는 점이 일반적인 개발 방식과 다르다. 이 차이점은 소프트웨어의 품질을 비롯한 유지 보수의 편의성, 가독성, 그리고 그에 따른 소프트웨어의 비용과 안정성 등 여러 가지 측면의 의미를 내포한다. 따라서 이 책의 나머지 부분 전반에 걸쳐 TDD를 사용하 어떻게 해면 '깔끔하고 잘 동작하는 코드'를 얻을 수 있는지를 이야기할 것이다. 


테스트 주도 개발의 진행 방식


ㅁ질문(ASK) : 테스트 작성을 통해 시스템에 질문한다.(테스트 수행 결과는 실패)


ㅁ응답(Respond): 테스트를 통과하는 코드를 작성해서 질문에 대답한다.(테스트 성공)


ㅁ정제(Refine): 아이디어를 통합하고, 불필요한 것은 제거하고, 모호한 거승ㄴ 명확히 해서 대답을 정제한다(리펙토링)


ㅁ반복(Repeat): 다음 질문을 통해 대화를 계속 진행한다.


출저: http://blog.naver.com/hero1014?Redirect=Log&logNo=20184110933


'2019년 이전 정리 > TDD' 카테고리의 다른 글

TDD 프로젝트 적용  (0) 2013.08.18
Posted by hoonihoon
2013. 8. 8. 17:47

안드로이드 앱을 개발하다 보면 활성화 / 비활성화 표시로 이미지를 grayscale로 만들어 표시할 경우가 있다. 물론 원본 이미지와 grayscale 이미지가 있으면 간단하게 할 수 있지만 원본 이미지만 있어도 코드로 
이미지를 grayscale로 만들 수 있다.

1. RGB 이미지를 GrayScale로 변경하기
GrayScale로 변경하기 위해서는 ColorMatrix 클래스를 사용하게 된다. ColorMatrix는 5x4 matrix로 1차원 float 배열 (float[20])을 사용한다. 기본 matrix 값은 아래와 같다. 자세한 내용은 영상처리와 함께 공부하면 도움이 된다.
*http://developer.android.com/reference/android/graphics/ColorMatrix.html

1 0 0 0 0  - red
0 1 0 0 0  - green
0 0 1 0 0  - blue
0 0 0 1 0  - alpha

기본적으로 밝기 조절은 5번째 행의 값을 올려주면 그 만큼 밝아지게 된다. contrast 조절은 기본 matrix의 1로 된 부분의 값을 변경해 주면 된다.

grayscale로 변경할 때는 직접 matrix 값을 수정할 필요하가 없다. 수학에 약한 사람이라면 참 다행인 일이다. 나에게도 다행이다. ^^;;

색의 3요소는 색상, 명도, 채도 이다.(인터넷에 나와있다. 필자는 미술에 약하다ㅠ.ㅠ) grayscale로 만들기 위해서는 채도를 수정해야 한다. 채도값이 없으면 흰색, 검은색 등 무채색이 된다. 즉 grayscale은 채도값을 0으로 만들어 주면 된다.

ColorMatrix.setSaturation(float sat); 메소드를 사용하면 RGB 이미지를 grayscale로 만들 수 있다.
RGB 이미지를 grayscale로 바꾸는 ColorMatrix를 생성했는데 어떻게 적용할까?

방법은 2가지가 있다. 이미지 뷰에 적용하는 방법, 그리고 drawable에 적용하는 방법.

2. 이미지뷰에 적용하기
ImageView.setColorFilter(ColorFliter filter); 메소드가 있다. 이 메소드를 이용하여 적용하면 된다. 하지만 파라미터의 데이터 형은 ColorFilter이다. ColorMatrix를 적용할 수 없다. 이를 가능하게 해주는 다리 역할을 ColorMatrixColorFilter 클래스가 한다. 이제 적용해 보자.

//이미지뷰를 gray scale로 변경
public void setGrayScale(ImageView v){
    ColorMatrix matrix = new ColorMatrix();
    matrix.setSaturation(0);                        //0이면 grayscale
    ColorMatrixColorFilter cf = new ColorMatrixColorFilter(matrix);
    v.setColorFilter(cf);
}

3. Drawable에 적용하기
Drawable.setColorFilter(ColorFliter filter); 메소드가 있다. 이미지뷰의 마찬가지로 ColorMatrixColorFilter를 사용하면 된다.

//drawable만 grayscale로 변경
public Drawable convertGrayScale(Drawable d){
    ColorMatrix matrix = new ColorMatrix();
    matrix.setSaturation(0);                    //0이면 grayscale
    ColorMatrixColorFilter cf = new ColorMatrixColorFilter(matrix);
    d.setColorFilter(cf);

    return d;
}


4. 적용한 ColorMatrix 되돌리기
ImageView와 Drawable 모두 clearColorFilter(); 메소드가 있다. 이 메소드를 이용하여 적용된 ColorMatrix를 다시 되될릴 수 있다.

m2ndImageView.clearColorFilter();                        //이미지뷰의 컬러필터 삭제
m3rdImageView.getDrawable().clearColorFilter();        //drawable의 컬러필터 삭제

Drawable의 ColorFilter를 되돌렸으면 해당 drawable을 사용하는 뷰를 invalidate() 해준다.


m3rdImageView.invalidate();                                //3번째 이미지뷰 새로 고침

5. Drawable에 적용할 경우 주의 사항
Drawalbe을 얻어올 때 앱 내의 res폴더에 있는 이미지를 얻어올 경우( ImageView.getDrawable(), Resources.getDrawable(int id) ) 얻어온 drawable에 바로 ColorMatrix를 적용하면 안된다. 이 경우 해당 리소스가 변경되는 것이므로 그 리소스를 쓰는 다른 뷰의 이미지도 같이 변경된다. 이런 경우를 막기 위해 가져온 Drawable 객체의 mutate() 메소드를 써서 다시 drawable을 가져오는 것이다.

Drawable d = m3rdImageView.getDrawable().mutate();        //drawable을 얻어옴.
m3rdImageView.setImageDrawable(convertGrayScale(d));        //grayscale로 변경 후 이미지 지정


전체 샘플 코드 첨부하였습니다.
*글과 자료는 출처만 밝히시면 얼마든지 가져다 쓰셔도 됩니다.


 GrayScaleTest.zip


출저 : http://blog.daum.net/mailss/22

'Android > ImageView' 카테고리의 다른 글

Android) ImageView android:scaleType  (0) 2013.08.08
Posted by hoonihoon