* 이번에는 기존 안드로이드 개발자들도 다소 생소할 Fragment에 대해서 공부해보자. Fragment는 디바이스가 워낙에 다양해졌기 때문에 작은 모바일 화면, 중간 사이즈 모바일, 그리고 태블릿까지 지원해주기 위하여 코드 재사용성을 높여주기 위한 새로운 개발 디자인이기 때문에 기존의 Activity 기반의 화면 구성보다 더 발전되고 호환성이 있는 디자인을 꾸밀 수가 있게 됐다.
- 이전 글
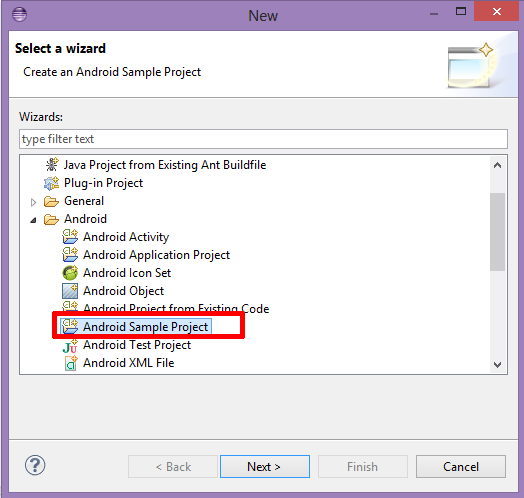
2012/11/07 - [Android(안드로이드) 앱 개발 기초] 안드로이드 프로젝트 생성하고 에뮬레이터로 앱 실행하기
2012/11/10 - [Android(안드로이드) 앱 개발 기초] 간단한 인터페이스 구현과 다른 Activity로 넘어가기
2012/11/21 - [Android(안드로이드) 앱 개발 기초] Activity 라이프사이클 공부
2012/11/24 - [Android(안드로이드) 앱 개발 응용] Google Map API로 지도 보여주기(MapView), Overlay Item 그려주기 예제
2012/11/28 - [Android(안드로이드) 앱 개발 응용] Location GPS 위치 가져오기 및 최적화
2012/12/05 - [Android(안드로이드) 앱 개발 기초] 런타임 설정(로테이션, orientation) 변환 라이프사이클
2012/12/19 - [Android(안드로이드) 앱 개발 응용] 쉽게 Google Map 위에 말풍선 띄우기
* Fragment
: Fragment는 Activity 내부에서 UI나 프로세스를 정의할 수 있는 더 작은 단위이고, 하나의 Activity에 다수의 Fragment를 배치하거나 여러 개의 Activity에서 하나의 Fragment를 재사용하는 것이 가능하다. 따라서 Fragment는 Activity를 구성하는 작은 모듈이라고 생각하면 되며, Activity와는 별도의 라이프사이클과 이벤트 또한 따로 처리가 가능하고, 하나의 Activity가 실행되고 있을 때 유동적으로 추가하고 삭제가 가능하도록 되어있다.
: Fragment는 반드시 Activity에 포함되어있어야하며, 포함된 Activity에 의해 Fragment 만의 라이프사이클이 진행되고 해당 Activity의 라이프사이클에도 직접적으로 영향을 받도록 되어있다. 예를 들면, Activity가 pause 단계에 들어가면 하위 Fragment들도 모두 pause가 되고, Activity가 destroy 되면 하위 Fragment 또한 전부다 destroy 된다. 어찌되었든, Activity가 running 상태를 유지하고 있을 때 하위 Fragment들을 독립적으로 추가 삭제하는 등 다룰수 있고, 그러한 동작을 했을 때에는 백스택에 들어가게 되며, 사용자가 백버튼을 누르게 되면 이 백스택에 있는 동작들을 취소할 수 있도록 지원해준다.
: Activity에 Fragment를 추가할 때에는 Activity 안에 ViewGroup를 추가하여 이 안에 설정을 하고 Fragment 자체에도 별도의 레이아웃을 만들어서 저장하면 된다. Fragment를 Activity의 레이아웃 xml에 추가할 때에는 <fragment> 태그를 사용하고, 소스단에서 추가를 하고 싶다면 이미 존재하는 ViewGroup 에 추가를 하면 된다. 하지만 Fragment를 사용할 때에는 반드시 Activity의 레이아웃에 추가할 필요는 없고 별도의 UI 없이 Activity를 위한 프로세스 처리를 담당할 수도 있다.
: 그럼 이제부터 Fragment를 이용하여 앱을 만들고, Activity와는 다른 Fragment의 상태들에 대하여 알아보고, Activity의 백스택에 추가할 때 상태를 유지하는 방법, 그리고 이벤트를 Activity나 다른 Fragment와 공유하는 방법 등을 알아보자.
* 디자인 철학
: Fragment는 허니콤(안드로이드 3.0, API level 11)에서부터 태블릿을 위한 UI 개발 방법 디자인으로 소개되었고 다양한 사이즈의 화면에 대하여 더 많은 UI를 보여주거나 일을 처리할 수 있도록 앱의 UI 디자인을 도와준다. Fragment는 Activity의 레이아웃을 부분부분 나눠서 개발자가 다른 크기의 화면에서 개발할 때 View의 구조를 복잡하게 수정하지 않아도 쉽게 재사용할 수 있도록 도와준다. 이렇게 Activity를 여러 모듈들로 나눔으로써 Activity는 런타임 동안 레이아웃을 유동적으로 바꿀수도 있고 백스택에 그 변화를 저장하여 백 버튼과의 연동 또한 쉽게할 수 있게 된다.
: 예를 들면, 메일을 읽는 앱이 있다고 할때 Fragment 하나는 메일 목록을 나타내는 Fragment로 설정하고, 메일의 내용을 보여주는 화면을 또 다른 Fragment로 설정했을 때에 태블릿에서는 큰 화면에서 하나의 Activity 안에 왼쪽에 뉴스의 목록을 보여주는 Fragment를 띄워주고, 오른쪽에는 메일의 내용을 보여주는 식으로 화면을 구성해서 각 Fragment가 독립적인 사용자 입력과 라이프사이클을 가질 수 있도록 구성하여 사용자가 큰 화면에서는 하나의 Activity에서 화면의 전환없이 메일을 선택하고 읽을 수 있도록 해줄 수 있다.
: 이를 모바일로 옮길 때 각 목록을 보여주는 Fragment와 내용을 보여주는 Fragment를 재사용하여 서로 다른 Activity에 넣어서 작은 화면에서는 목록을 선택하는 화면 따로, 내용을 보여주는 화면을 따로 설정할 수 있도록 할 수 있는 것이다. 이것은 Fragment 하나가 여러 개의 다른 Activity에 포함될 수 있기 때문에 화면 사이즈에 따라 다른 Activity를 사용하면서 같은 Fragment를 이용하고 Fragment들을 다르게 조합하여 UX를 최적화할 수 있도록 도와주는 것이다. 이렇게 큰 화면에서는 한 화면에 전부 포함했지만, 작은 화면에서는 기능을 나눠야할 때가 있을 때 Fragment를 활용하면 편리하다.

* Fragment 만들기
:Fragment를 만들기 위해서는 Fragment 클래스를 확장해야한다. Fragment의 소스코드는 Activity와 상당히 비슷하게 구성되어있는데 onCreate(), onStart(), onPause()등과 같이 Activity와 비슷한 함수들도 포함되어있다. 따라서 기존의 안드로이드 앱을 Fragment 기반으로 수정하고 싶다면 Activity의 이벤트 콜백 함수들을 조금만 수정할 수 있다. 일반적으로 Activity와 비슷하게 다음의 라이프사이클을 가지게 된다.
- onCreate(): 시스템이 Fragment를 처음에 만들 때 호출한다. Fragment 안에서 onPause나 onStop 단계에 들어갔다가 다시 resume 할 때에도 계속 유지될 중요한 정보나 요소들은 이 단계에서 초기화를 하면 된다.
- onCreateView(): Fragment가 UI를 처음으로 그리고자할 때에 호출된다. Fragment를 통해 UI를 그리고자 한다면 이 함수의 결과로 Fragment layout의 루트에 해당하는 View를 리턴해야한다. 만약 null을 리턴한다면 Fragment는 UI를 제공하지 않는다.
- onPause(): 시스템이 사용자가 Fragment를 떠날 때에 호출된다. 이는 Fragment가 반드시 없어지는 것을 뜻하지는 않으며, 이 콜백 함수 안에서 사용자가 다시 돌아오지 않았을 경우 유지시켜줄 데이터들을 저장하는 과정을 구현하는 것이 좋다.
: 모든 앱은 최소한 위의 3가지 콜백 함수를 모든 Fragment마다 기본적으로 구현해야 하며, 다른 시기에 호출되는 다른 콜백함수들을 사용함으로써 다양하게 Fragment의 라이프사이클을 조율할 수 있다.

: 기본 Fragment 이외에도 이를 확장하고 있는 보조적인 역할들을 하는 Fragment들이 있다.
- DialogFragment: 떠다니는 다이얼로그를 보여주는 Fragment. Fragment는 백스택에 넣어둘 수 있기 때문에 사용자가 다시 Fragment로 복귀하고자 할 때에 Activity에 기본적으로 들어있는 다이얼로그 대신에 사용할수 있는 좋은 대체제이다.
- ListFragment: Adapter를 통해서 List를 보여주는 Fragment로 ListActivity와 비슷하고, list view에서 다룰 수 있는 onListItemClick()과 같은 콜백 함수들도 제공한다.
- PreferenceFragment: Preference 객체들을 목록으로 보여주는 PreferenceActivity와 비슷하며, 앱의 Settings를 만들 때에 유용하게 사용할 수 있다.
* UI 추가하기
: Fragment의 UI는 Activity의 UI의 일부로 제공되며 Fragment만의 레이아웃 xml을 보유한다. Fragment를 통해서 레이아웃을 제공하고자한다면, 안드로이드 시스템이 Fragment의 레이아웃을 그릴 때 호출하는 onCreateView() 콜백 함수를 구현해야한다. 이 함수에서 Fragment의 레이아웃의 루트 View를 리턴하면 된다. 만약에 ListFragment를 이용하고 있다면, 기본적으로 ListView를 리턴하기 때문에 별도로 구현할 필요는 없다.
: onCreateView()에서 레이아웃을 리턴하기 위해서는 XML로 레이아웃을 생성하여 inflater를 이용하여 View를 생성하면 되는데, onCreateView() 함수에서는 기본적으로 인자에서 LayoutInflater를 넘겨주기 때문에 이것을 이용하여 View를 생성하면 된다.
1 2 3 4 5 6 | public static class ExampleFragment extends Fragment {
@Override
public View onCreateView(LayoutInflater inflater, ViewGroup container, Bundle savedInstanceState) {
return inflater.inflate(R.layout.example_fragment, container, false);
}
}
|
: 여기서 container 인자는 해당 Fragment를 삽입할 부모 Activity에서 온 ViewGroup을 넘겨주고, savedInstanceState 인자는 이전의 상태에 대한 데이터를 포함하여 인자로 넘겨주게 된다. 그리고 inflate 함수는 3개의 인자를 받게 되는데 아래와 같다.
- inflate를 실행할 레이아웃의 리소스 ID
- inflate한 레이아웃의 부모가 될 ViewGroup. 인자로 받았던 container를 넘겨주는 것은 시스템에서 inflate한 레이아웃을 어디에 그려야할지 정해줘야하는 중요한 단계이다.
- 세번째는 inflate한 레이아웃을 두번째 인자에 추가할 것인지 여부를 묻는 인자로, 시스템에서 자동으로 inflate한 내용을 container에 추가하게 되므로 false를 넘겨줘야 중복되게 추가하는 일이 없다.
* Fragment를 Activity에 추가하기
: Fragment는 일반적으로 Activity의 전체 UI 중 일부를 표현하게 된다. 따라서 2가지 방법으로 Activity의 레이아웃에 추가할 수 있다.
- Fragment를 Activity의 레이아웃 XML 파일에 추가
: 2개의 Fragment 를 나란히 붙이고자한다면 아래와 같은 구조의 XML 레이아웃을 가지면 된다.
1 2 3 4 5 6 7 8 9 10 11 12 13 14 15 16 | <?xml version="1.0" encoding="utf-8"?>
android:orientation="horizontal"
android:layout_width="match_parent"
android:layout_height="match_parent">
<fragment android:name="com.example.mail.MailListFragment"
android:id="@+id/list"
android:layout_weight="1"
android:layout_width="0dp"
android:layout_height="match_parent" />
<fragment android:name="com.example.mail.MailContentsFragment"
android:id="@+id/viewer"
android:layout_weight="2"
android:layout_width="0dp"
android:layout_height="match_parent" />
</LinearLayout>
|
: 여기서 <fragment> 태그의 android:name 속성은 위의 레이아웃이 사용할 Fragment 클래스를 나타내는데, 시스템에서 Activity의 레이아웃을 생성할 때에 위의 android:name에 명시된 Fragment 클래스의 인스턴스를 생성하여 onCreateView를 호출하여 바로 <fragment>의 위치에 넣게 된다. 위와 같이 레이아웃을 통해 Fragment를 선언하는 경우 Fragment를 다시 시작하기 위해서는 아이디를 부여해줘야하는데 일반적으로 3가지 방법이 있다.
- android:id 속성에 ID 추가
- android:tag 에 스트링을 ID로 추가
- 위의 두가지를 사용하지 않는다면 부모 View의 ID를 사용하게 된다.
: Activity가 실행되고 있는 동안에도 Fragment를 Activity의 레이아웃에 추가하는 것이 가능하다. 이 때에는 단순히 ViewGroup만 있으면 되며, Activity로부터 FragmentTransaction을 가져와서 아래와 같이 활용할 수 있다.
1 2 | FragmentManager fragmentManager = getFragmentManager();
FragmentTransaction fragmentTransaction = fragmentManager.beginTransaction();
|
: 그리고 fragmentTransaction의 add 함수와 commit 함수를 통해서 view에 Fragment를 추가할 수 있다.
1 2 3 | ExampleFragment fragment = new ExampleFragment();
fragmentTransaction.add(R.id.fragment_container, fragment);
fragmentTransaction.commit();
|
: 여기서 fragmentTransaction.add() 함수에 첫번째 인자로 해당 Fragment가 위치될 ViewGroup의 리소스 ID를 넘겨주고, 두번째 인자로 추가할 Fragment를 넣으면 된다. fragmentTransaction에 Fragment를 추가하거나 변화를 주었을 경우에는 반드시 commit()함수를 실행해야 변화가 적용된다.
* UI 없이 Fragment 추가하기
: 위에는 Activity에 UI로서 일부 포함되는 Fragment를 보여줬다면 이번에는 UI를 제공하지 않고 백그라운드에서 동작하는 Fragment를 추가하는 방법을 살펴보자.
: UI가 없는 Fragment를 추가하기 위해서는 View에 설정하는 ID가 없기 때문에 tag를 통해 설정한 ID를 통해서 Fragment를 찾아서 추가해야하는데, 이때에 FragmentTransaction.add(Fragment, String) 함수를 사용하면 된다. 이 때 두번째 인자는 Fragment의 tag로 고유한 스트링 ID를 부여하면 된다. 이 함수를 활용해서 Fragment를 추가하는 경우 Activity의 View와 연동되지 않았기 때문에 Fragment의 onCreateView 함수가 호출되지 않으므로 이 함수를 구현할 필요가 없다.
: tag를 이용한 ID의 할당은 UI가 없는 Fragment에 제한되지 않고 UI가 있어도 tag를 통한 스트링 ID를 부여할 수도 있지만 UI가 없다면 오로지 tag를 이용해서 스트링 ID를 할당해야 Activity 로부터 Fragment를 찾을 때 findFragmentByTag() 함수를 활용할 수 있다.
* Fragment를 관리하기
: Activity 안에서 Fragment를 관리하기 위해서는 FragmentManager를 활용해야하는데, Activity 안에서 getFragmentActivity() 함수를 호출함으로써 얻어올 수 있다. 이 FragmentManager를 통해서 할 수 있는 것들은 아래와 같다.
- Activity 안에 존재하고 있는 Fragment를 findFragmentById()나 findFragmentByTag()를 통해서 검색
- 사용자가 백버튼을 누른것과 같은 효과로 popBackStack()를 활용하여 백스택에 들어있는 Fragment를 팝
- addOnBackStackListener()를 통해 백스택이 바뀌었을 때 호출되는 콜백 리스너 등록
: 그리고 또 위의 예에서 쓰였던 FragmentTransacttion을 가져와서 Fragment들을 추가하거나 삭제할 수 있는 트랜젝션을 생성하는데 사용된다.
* Fragment 트랜젝션 사용하기
: Fragment의 가장 큰 장점은 바로 현재의 Activity 안에서 추가하고 삭제하고 교체하면서 다른 여러 가지 동작들을 함께 실행할 수 있다는 것이다. Activity에 행하는 변화들은 트랜젝션으로 불리우며, API에서는 FragmentTransaction을 활용하여 구현할 수 있다. 또한 각 트랜젝션을 백스택에 저장하여 사용자가 백버튼을 눌렀을 때 변화되었던 내용을 다시 원복하는 것도 가능하다. 이러한 FragmentTransaction은 FragmentManager를 통해서 얻을 수 있다.
1 2 | FragmentManager fragmentManager = getFragmentManager();
FragmentTransaction fragmentTransaction = fragmentManager.beginTransaction();
|
: 여기서 하나의 트랜젝션에는 동시에 실행되길 원하는 동작들을 추가하여 사용하면 되고, 이러한 동작들은 add() 함수, remove() 함수, replace() 함수를 통해서 설정할 수 있다.그리고 모든 동작들을 추가하고나면 commit() 함수를 통해서 동시에 실행하게 된다. 이렇게 commit()을 하기 전에는 addToBackStack()함수를 호출하여 이전 상태를 백스택에 추가하여 사용자가 백버튼을 눌렀을 때에 대한 호환성을 추가할수도 있다. 백스택에 추가하여 이전 상태를 저장하는 예는 아래와 같다.
1 2 3 4 5 6 7 | Fragment newFragment = new ExampleFragment();
FragmentTransaction transaction = getFragmentManager().beginTransaction();
transaction.replace(R.id.fragment_container, newFragment);
transaction.addToBackStack(null);
transaction.commit();
|
: 위의 예에서 새로운 newFragment를 만들고, 현재 R.id.fragment_conatiner의 아이디를 가지고 있는 레이아웃에 있는 Fragment를 교체하게 되는 것이다. 그리고 addToBackStack()함수를 호출함으로써 교체된 Fragment는 백스택에 저장되어 사용자가 다시 이전의 상태로 가고자할 때를 대비해서 보존하게 된다. 하나의 트랜젝션 안에서 add()나 remove() 등을 이용해서 여러 개의 변화를 한꺼번에 addToBackStack()에 저장하고 commit()하게 사용자가 백버튼을 눌렀을 때에도 한꺼번에 다시 원래대로 돌아오게 된다. 만약 Fragment가 바뀌는 애니메이션을 원한다면 commit() 하기 전에 setTransition() 함수로 애니메이션을 설정할 수도 있다.
: commit()을 호출하는 것은 바로 트랜젝션을 씰행한다기보다는 Activity의 UI 스레드에 추가하여서 실행가능할 때에 실행이 되는데, 만약 어떠한 Fragment가 다른 Fragment가 반드시 먼저 실행되어야한다면 스레드에 대기중인 트랜젝션을 executePendingTransactions() 함수를 통해서 바로 실행할수가 있다. 하지만 이 함수를 호출해야할 필요성이 있는 것은 위와 같이 의존성이 있을 때에만 해당된다. commit()을 할 때의 주의점이라면 호출하는 시점은 Activity가 상태를 저장하기 전에 이루어져야한다. 만약 Activity의 onSaveInstanceState 콜백함수가 호출되고나서 commit을 하고자한다면 예외 상황이 발생할 것이고, 만약 이 상태 이후에 commit()을 하고 싶다면 commitAllowingStateLoss()를 이용하여 commit하면 된다.
* Acitivty와 의사소통하기
: Fragment는 Activity와는 별개로 독립적인 모듈로 구현이 되지만, 다양한 Activity 안에서 활용될 수 있기 때문에 현재 포함된 Activity와 연결되어야할 필요성이 있다. 따라서 만약 Activity의 객체에 접근을 하고 싶다면, Fragment 클래스의 getActivity() 함수를 이용하면 Activity의 함수들을 활용할 수 있따.
1 | View listView = getActivity().findViewById(R.id.list);
|
: 반대로 Activity에서 Fragment에 접근을 하고자 한다면, FragmentManager의 findFragmentById() 함수나 findFragmentByTag()를 통해서 Fragment를 검색하여 접근하면 된다.
1 | ExampleFragment fragment - (ExampleFragment) getFragmentManager().findFragmentById(R.id.example_fragment);
|
* Activity에 이벤트 콜백을 설정하기
: Fragment에서는 Activity와 이벤트를 공유하고자할 때에는 콜백 인터페이스를 정의하여 Activity에서 이벤트 콜백의 구현을 요청할 수 있다. 만약 Acitivty가 콜백을 Fragment를 통해서 받게 되면 다른 Fragment로부터 정보를 받아서 공유를 할 수 있게 된다. 예를 든다면 메일 앱에서 2개의 Fragment가 Activity에 포함되고 있을 때에 Fragment A에서 목록을 보여주고, Fragment B에서는 그 내용을 보여준다고 할 때에 Fragment A에서 아이템을 선택했을 때 그 정보를 Fragment B에 넘겨줘야하는데 이럴 때에 아이템을 선택하는 이벤트의 콜백을 Activity에 설정하여 Activity에서 Fragment B 로 변화를 요청하는 구조를 가지면 된다. 예를 들면, 이럴 때에는 Fragment A 안에 OnArticleSelectedListener 인터페이스를 구현하여 활용하면 된다.
1 2 3 4 5 | public static classFragmentA extends ListFragment {
public interface OnArticleSelectedListener {
public void onArticleSelected(Uri articleUri);
}
}
|
: 이렇게 Fragment 에서 인터페이스를 정의하면 이 Fragment를 포함하고 있는 Activity는 이 인터페이스를 구현하여 onArticleSelected 함수를 구현하여 Fragment의 onAttach 콜백함수에서 리스너를 설정하면 된다. 이 onAttach 함수는 Fragment가 Activity에 추가 될 때 호출되는 콜백 함수이다.
1 2 3 4 5 6 7 8 9 10 11 12 13 | public static class FragmentA extends ListFragment {
OnArticleSelectedListener mListener;
@Override
public void onAttach(Activity activity) {
super.onAttach(activity);
try {
mListener = (OnArticleSelctedListener) activity;
} catch (ClassCastException e) {
throw new ClassCastException(activity.toString() + " must implement OnArticleSelectedListener)l
};
}
}
|
: 이렇게 Fragment가 추가되었을 때에 추가된 Activity를 리스너로 추가하면서 만약 Activity가 OnArticleSelectedListener를 구현 안했으면 예외를 발생시키게 된다. 이제 Fragment에서 이벤트가 발생하게 되면 멤버 변수로 설정된 Activity의 onArticleSelected함수를 호출하여 다른 Fragment와 정보를 공유하면 된다. 이제 ListFragment에 들어있는 onListItemClick 이벤트 콜백 함수에 해당하는 mListener의 onArticleSelected 함수를 호출하는 부분을 구현하면 된다.
1 2 3 4 5 6 7 8 9 | public static class FragmentA extends ListFragment {
OnArticleSelectedListener mListener;
@Override
public void onListItemClick(ListView l, View v, int position, long id) {
Uri noteUri = ContentUris.withAppendedId(ArticleColumns.CONTENT_URI, id);
mListener.onArticleSelected(noteUri);
}
}
|
: onListItemClick에서 넘어오는 id를 기반으로 클릭된 아이템의 id를 가져와서 ContentProvider를 통해서 해당하는 데이터를 요청할 수 있도록 uri를 넘겨주고 있다. uri를 생성하는 부분은 content provider에 대하여 공부하면 알 수 있다.
* 액션바에 아이템 추가하기
: Fragment는 또한 onCreateOptionsMenu()를 구현함으로써 옵션 메뉴와 액션바 메뉴의 아이템에 영향을 미칠수 있다. 이 함수가 호출을 받으려면 일단 setHasOptionsMenu()를 onCreate() 함수 안에서 호출하여 현재의 Fragment가 옵션메뉴에 항목을 추가하겠다는 것을 명시해야한다. 만약 명시를 안한다면, onCreateOptionsMenu() 함수는 호출되지 않을 것이다.
: 옵션메뉴에 추가한 메뉴 아이템들은 현재의 메뉴 아이템의 뒤에 추가될 것이고, 또한 Fragment에서는 옵션 메뉴가 선택되었을 때 onOptionsItemSelected() 콜백 함수가 호출된다. 또한 Fragment 레이아웃에서 컨텍스트 메뉴를 설정할수도 있는데, registerForContextMenu() 함수를 호출하게 되면 사용자가 컨텍스트 메뉴를 열 때에 onCreateContextMenu()의 콜백 함수가 호출되고, 사용자가 컨텍스트메뉴의 항목을 선택하게 되면 onContextItemSelected() 콜백 함수가 호출된다.
: 위처럼 Fragment에서 컨텍스트메뉴나 메뉴 아이템에 대한 콜백 함수를 설정하지만 우선적으로 Activity에 있는 콜백함수가 호출되며, 만약 Activity에서 해당하는 메뉴 아이템을 다루지 않는다면, 이벤트는 Fragment를 통해서 호출될 것이다.
* Fragment의 라이프 사이클
: Fragment의 라이프사이클을 다루는 것은 Activity의 라이프사이클을 다루는 것과 비슷하다. Activity와 같이 Fragment에서는 3가지의 상태를 가지고 있다.
- Resumed: 현재 Fragment가 실행되고 있는 Activity에 있다.
- Paused: 다른 Activity가 전면에 나와서 포커스를 가지고 있지만, 현재 Fragment가 포함된 Activity는 아직은 일부가 보이고 있다. 앞에 있는 Activity는 반투명하거나 전체 화면을 덮고 있지 않다.
- Stopped: 현재 Fragment가 보이지 않는다. 현재 Activity가 멈추었거나, Fragment가 Activity에서 삭제되었지만 아직 백스택에 있는 경우에 이 상태에 들어간다. 이렇게 Stopped 상태에 있는 Fragment는 아직 메모리에 남아있으며 모든 상태와 멤버 정보는 시스템에 의하여 보존되지만 현재 사용자에게는 보이지 않고 Activity가 destroy될 때 Fragment도 같이 destroy된다.
: Activity와 같이 Fragment의 상태를 저장하기 위하여 Bundle을 이용하여 onSaveInstanceState 함수 안에서 저장하고,, Activity의 프로세스가 Fragment를 삭제하거나 Activity가 멈췄다가 다시 생성되었을 때 Fragment의 상태를 되돌리고자할 떄에 onCreate()나 onCreateView(), onActivityCreated() 함수 안에서 다시 상태를 재생하면 된다.
: Fragment의 라이프사이클이 Activity와 가장 다른 점은 바로 백스택에 저장되고 상태를 유지해야한다는 점이다. Activity들은 시스템에서 자동적으로 백스택에 넣어지는 반면에 Fragment는 트랜젝션을 통해서 Activity에서 Fragment를 백스택에 넣으라고 addToBackStack() 함수를 통해 요청을 해야 들어가게 된다. 이외에는 Fragment의 라이프사이클은 Activity의 라이프사이클과 매우 비슷하여 관리하기 편리하다. 따라서 Activity의 라이프사이클을 관리하는 방법을 그대로 Fragment에 적용하면 하면 되고, Activity의 라이프사이클이 Fragment의 라이프사이클에 어떻게 영향을 미치는지 파악하면 좋다.
* Activity의 라이프사이클와 조율하기
: Activity의 사이프사이클은 바로 Fragment의 라이프사이클에 영향을 미치게 되며 Activity의 라이프사이클 콜백함수가 호출 될 때에 그에 해당하는 Fragment의 라이프사이클 콜백 함수도 호출된다. 예를 들면, Activity의 onPause가 호출될 때 Fragment의 onPause 또한 호출된다.
: 이외에도 Fragment에서는 몇가지 추가적인 라이프사이클 콜백 함수들이 있어서 Activity 와의 상호작용을 용이하게 도와주고 있다.
- onAttach(): Activity에 할당되었을 때 호출되며 인자로 Activity를 넘겨준다.
- onCreateView(): Fragment에 할당된 View를 생성하고자 할 때 호출된다.
- onActivityCreated(): Activity의 onCreate() 함수가 호출되고나서 호출된다.
- onDestroyView(): Fragment의 View가 제거될 때 호출된다.
- onDetach(): Fragment가 Activity로부터 할당이 제거될 때 호출된다.
: Fragment의 라이프사이클은 Activity의 라이프사이클에 따라서 아래의 그림과 같이 매핑되어 있다.

: 여기 나와있는 것은 Activity의 각 상태가 성공적으로 전이가 되었을 때, Fragment가 호출 받을 수 있는 콜백 함수의 목록이다. 예를 들면, Activity가 onCreate()의 호출을 받으면, Fragment는 onActivityCreated() 함수까지만 진행이 가능한 것이다. 그리고 한번 Activity가 resumed 상태에 도착하게 되면, Fragment를 자유롭게 추가하고 삭제를 하게 되는데, 이 때에만 Fragment는 라이프사이클의 변화가 자유롭게 일어날 수 있게 되는 것이다. 어찌되었든, Activity가 resumed 상태를 벗어날 때, Fragment는 또 다시 Activity의 라이프사이클에 의존적으로 라이프사이클을 진행하게 된다.
* Fragment 예
: 이번에는 위에서 예를 들었던 목록과 내용을 볼 수 있는 2개의 Fragment를 사용하는 Activity의 예를 살펴보자. 아래의 Activity는 하나의 Fragment에서는 글 목록을 보여주고 다른 하나는 선택된 아이템의 상세 정보를 표시해주는 역할을 하게 된다. 또한 화면 설정에 따라 다른 환경 설정을 하는 것도 살펴보자. 일단 Activity에서는 onCreate()안에서 레이아웃을 설정한다.
1 2 3 4 5 | @Override
protected void onCreate(Bundle savedInstanceState) {
super.onCreate(savedInstanceState);
setContentView(R.layout.fragment_layout);
}
|
: 그리고 위에서 사용하고 있는 fragment_layout.xml은 아래와 같이 구성한다.
1 2 3 4 5 6 7 8 9 10 11 12 13 14 15 16 | android:orientation="horizontal"
android:layout_width="match_parent"
android:layout_height="match_parent">
<fragment class="com.example.android.apis.app.FragmentLayout$TitlesFragment"
android:id="@+id/titles"
android:layout_weight="1"
android:layout_width="0px"
android:layout_height="match_parent" />
<FrameLayout android:id="@+id/details"
android:layout_weight="1"
android:layout_width="0px"
android:layout_height="match_parent"
android:background="?android:attr/detailsElementBackground" />
</LinearLayout>
|
: 위와 같이 시스템은 TitlesFragment을 초기화하고 곧 Activity에서는 우측의 FrameLayout을 초기화하여 보여줄 것이지만, 처음에는 빈 공간으로 남겨져 있고 사용자가 선택을 할 때에 내용이 나타날 것이다. 어찌 되었든, 위와 같은 경우는 단말이 가로로 있을 때 목록과 내용을 한 화면에서 편하게 보여줄 수 있으므로 가로 방향의 레이아웃으로 활용하기 위하여 res/layout-land/fragment_layout.xml 에 저장을 하도록 하자. 그리고 화면이 세로가 되었을 때에는 res/layout/fragment_layout.xml을 아래와 같이 작성하면 된다.
1 2 3 4 5 6 7 8 9 | android:layout_width="match_parent"
android:layout_height="match_parent">
<fragment class="com.example.android.apis.app.FragmentLayout$TitlesFragmenttt"
android:id="@+id/titles"
android:layout_width="match_parent"
android:layout_height="match_parent" />
</FrameLayout>
|
: 이렇게 세로로 된 경우에는 오로지 TitlesFragment만을 표시해주게 되고, 사용자가 목록 아이템을 누르면 앱에서는 2번째 Fragment를 바로 실행하기보다는 새로운 Activity를 시작하여 해당하는 Fragment를 시작하게 될 것이다. 다음에는 TitleFragment가 ListFragment를 확장하면서 타이틀 목록을 가져오는 것을 구현해보자. 아래의 소스에서 볼 수 있듯이 사용자가 아이템을 클릭했을 때에 2가지 행동이 가능하다. 화면이 가로로 있을 때에는 새로운 Fragment를 그려주거나 화면이 세로로 되어있을 때에는 새로운 Activity를 추가하는 것이다.
1 2 3 4 5 6 7 8 9 10 11 12 13 14 15 16 17 18 19 20 21 22 23 24 25 26 27 28 29 30 31 32 33 34 35 36 37 38 39 40 41 42 43 44 45 46 47 48 49 50 51 52 53 54 55 56 | public static class TitlesFragment extends ListFragment {
boolean mDualPane;
int mCurCheckPosition = 0;
@Override
public void onActivityCreated(Bundle savedInstanceState) {
super.onActivityCreated(savedInstanceState);
setListAdapter(new ArrayAdapter<string>(getActivity(), android.R.layout.simple_list_item_activated_1, ShakeSpeare.TITLES));
View detailsFrame = getActivity().findViewById(R.id.details);
mDualPane = detailsFrame != null && detailsFrame.getVisibility() == View.VISIBLE;
if (savedInstanceState != null) {
mCurCheckPosition = savedInstanceState.getInt("curChoice", 0);
}
if (mDualPane) {
getListView().setChoiceMode(ListView.CHOICE_MODE_SINGLE)l
showDetails(mCurCheckPosition);
}
}
@Override
public void onSaveInstanceState(Bundle outState) {
super.onSaveInstanceState(outState);
outState.putInt("curChoice", mCurCheckPosition);
}
@Override
public void onListItemClick(ListView l, View v, int position, long id) {
showDetails(position);
}
void showDetails(int index) {
mCurCheckPosition = index;
if (mDualPane) {
getListView().setItemChecked(index, true);
DetailsFragment details = (DetailsFragment) getFragmentManager().findFragmentById(R.id.details);
if (details == null || details.getShownIndex() != index) {
details = DetailsFragment.newInstance(index);
FragmentTransaction ft = getFragmentManager().beginTransaction();
if (index == 0) {
ft.replace(R.id.details, details);
} else {
ft.replace(R.id.a_item, details);
}
ft.setTransition(FragmentTransaction.TRANSIT_FRAGMENT_FADE);
ft.commit();
}
} else {
Intent intent = new Intent();
intent.setClass(getActivity(), DetailsActivity.class);
intent.putExtra("index", index);
startActivity(intent);
}
}
}
</string>
|
: 그리고 이번에는 두번째 Fragment인 DetailsFragment를 구현해보면, 현재 목록에서 선택된 아이템의 상세한 내용을 보여주도록 하는 것이다.
1 2 3 4 5 6 7 8 9 10 11 12 13 14 15 16 17 18 19 20 21 22 23 24 25 26 27 28 29 | public static class DetailsFragment extends Fragment {
public static DetailsFragment newInstance(int index) {
DetailsFragment f = new DetailsFragment();
Bundle args = new Bundle();
args.putInt("index", index);
f.setArguments(args);
return f;
}
public int getShownIndex() {
return getArguments().getInt("index", 0);
}
@Override
public View onCreateView(LayoutInflater inflater, ViewGroup container, Bundle savedInstanceState) {
if (container == null) {
return null;
}
ScrollView scoller = new ScrollView(getActivity());
TextView text = new TextView(getActivity());
int padding = (int)TypedValue.applyDimension(TypedValue.COMPLEX_UNIT_DIP, 4, getActivity().getResources().getDisplayMetrics());
text.setPadding(padding, padding, padding, padding);
scroller.addView(text);
text.setText(Shakespeare.DIALOGUE[getShownIndex()]);
return scroller;
}
}
|
: 이제 다시 이전에 구현했던 2번째 동작인 새로운 Activity를 열어서 별도의 화면으로 보여줄 때에 필요한 Activity를 구현해보면 아래와 같이할 수 있다.
1 2 3 4 5 6 7 8 9 10 11 12 13 14 15 16 17 | public static class DetailsActivity extends Activity {
@Override
protected void onCreate(Bundle savedInstanceState) {
super.onCreate(savedInstanceState);
if (getResources().getConfiguration().orientation == Configuration.ORIENTATION_LANDSCAPE) {
finish();
return;
}
if (savedInstanceState == null) {
DetailsFragment details = new DetailsFragment();
details.setArguments(getIntent().getExtras());
getFragmentManager().beginTransaction().add(android.R.id.content, details).commit();
}
}
}
|
: 위의 소스를 보면, 현재 Activity는 환경설정이 화면이 가로로 되어있으면 종료하고 상위의 Activity가 Fragment를 다루도록 하고 있는데, 이것은 바로 화면이 세로로 들어왔다가 사용자가 화면을 가로로 회전시키게 되면 현재 Activity를 종료하고 상위의 Activity에서 다루도록 하고 있는 것이다.
원문: http://developer.android.com/guide/components/fragments.html
끝.
출저: http://unikys.tistory.com/318